

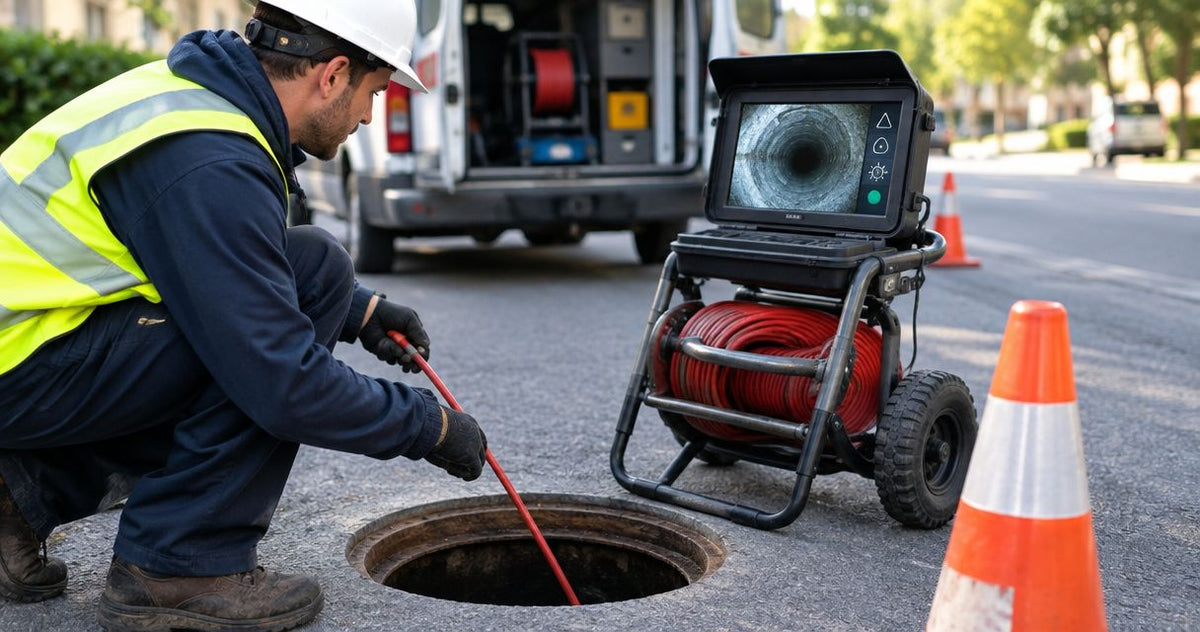
A municipal sewer inspection can start at a manhole, continue through a 6–24-inch mainline, and finish with a lateral connection that needs a closer view. The wrong deployment method leaves your crew with footage that misses the inspection objective or equipment that struggles with the route. Choose sewer cameras for municipal contractors by pipe diameter, access, travel method, viewing direction and the evidence your contract requires. This guide separates screening, detailed condition assessment, lateral work and post-lining inspection.
For 6–24-inch mainlines, decide first whether the job needs a powered crawler, a push camera or a pole-mounted overview. Then size the complete assembly and specify distance tracking, recording and reporting. Fiberscope.net sells inspection equipment and services it in-house; its technical specialists match systems to the job. Start with the pan-and-tilt push camera guide when your contract requires close views of joints and connections.
Why equipment choice matters for municipal sewer work
Municipal sewer contractors work across 6–24-inch mainlines, lateral connections, culverts and manholes. Those jobs require different access methods and different evidence, even when the crew uses the same inspection vehicle.
A condition assessment needs repeatable observations tied to an asset and a position along the line. A post-lining inspection needs views of the installed liner, joints and reinstated connections. A lateral launch needs equipment that can enter the branch from the mainline.
Choose the deployment method before choosing the camera head. Head movement determines where you can look; propulsion determines where you can travel. A pan-and-tilt push camera remains a push camera, and a skid supports the head without driving it through the line.
Write the inspection objective into the equipment request. “Inspect municipal sewers” leaves too much open. “Record the mainline wall and each connection from the upstream manhole, with distance references and the required condition codes” gives your supplier a usable starting point.
How to specify a municipal sewer camera
Use 6 decisions to turn a sewer inspection scope into an equipment specification: task, access, travel, view, locating and evidence. Resolve them in that order so a useful feature never substitutes for basic physical fit.
Define the inspection task
Separate mainline condition assessment from screening, lateral inspection and repair verification. Each task changes how close the camera must get, how it moves and what your crew must record.
For mainline condition assessment, identify the surfaces and connections that need examination. For culverts, include the entrance, barrel and outlet in the scope. For post-lining work, define the views required at reinstated connections and termination points.
NASSCO's PACP, LACP and MACP programs address pipeline, lateral and manhole condition assessment respectively. Use the program named in the contract to establish the reporting workflow before evaluating recording hardware.
Close the task definition with these requirements:
- Name the asset class: mainline, lateral, culvert or manhole.
- State whether the inspection is screening or detailed assessment.
- List the features that require close views.
- Identify pre-cleaning, post-cleaning or post-repair inspection stages.
- Specify the client's condition-assessment and reporting requirements.
Measure the access and complete assembly
For 6–24-inch mainlines, pipe diameter is only one part of equipment fit. The access opening, entry angle, obstructions and assembled camera envelope determine whether the equipment can enter and work through the route.
Pipe ID means internal diameter. Measure or obtain the usable opening at the deployment point, then account for the camera, skid, wheels, connectors and any projecting hardware. Compare the complete working assembly with the narrowest restriction.
A camera that enters a manhole still needs a workable path into the pipe. Benching, the shaped channel at the manhole base, and the angle between the opening and the line affect deployment. Include these details in a site sketch.
Use the pipe camera access and sizing guide to organize the measurements that control fit.
Record these access details:
- Pipe ID and changes in diameter along the route.
- Manhole or cleanout opening dimensions.
- Entry angle, benching and available handling space.
- Offsets, protruding connections and other restrictions.
- The assembled head, skid or crawler envelope.
Match propulsion and reach to the route
A push camera advances through force applied to its cable; a crawler advances under its own power. Select between them using the route, working distance, retrieval method and required control at the inspection point.
For a push system, cable length and usable reach are separate buying factors. Bends, friction, debris and changes in diameter affect how the assembly advances. Include the actual route in the demonstration rather than evaluating reach from a straight-line cable specification alone.
For a crawler, evaluate traction, steering, cable management and recovery together. A lateral-launch task adds another requirement: the equipment must enter the branch from the mainline and return through that connection.
Specify the intended endpoint and the retrieval plan together. This keeps the equipment decision tied to completing the inspection rather than simply reaching the defect.
Build the deployment requirement around these checks:
- Measure the inspection distance from the proposed entry point.
- Mark bends, gradients and changes in pipe diameter.
- Identify debris or flow conditions affecting travel.
- Define the required stopping and positioning control.
- Document recovery access and the retrieval procedure.
Select the view the defect requires
A forward view shows the route ahead; pan-and-tilt movement lets the operator direct the view toward the wall, joint or connection. For 6–24-inch mainlines, choose viewing control around the surfaces your inspection must document.
A joint assessment needs a useful view of the joint circumference. A reinstated lateral needs a view into the opening and around its edge. A culvert overview benefits from a deployment method that covers the barrel and entrance safely from the available access.
Lighting and centering belong in this decision. A low head position changes the angle to the wall, while a centered assembly changes the view around the circumference. Evaluate the picture at the intended working position with the lighting adjusted for that pipe.
Ask for a demonstration that shows these inspection actions:
- Stop at a joint and examine its circumference.
- Direct the view toward a lateral connection.
- Adjust lighting to retain visible surface detail.
- Record a still image and a video segment.
- Repeat the view after repositioning the assembly.
Specify locating as a separate function
A camera-head sonde transmitting at 512 Hz requires a separate receiver that supports 512 Hz. A sonde is the transmitter used to locate the head from above ground; it is distinct from the recording system.
State the transmitter frequency and receiver frequency separately in the equipment specification. If your crew already owns a receiver, use its supported sonde frequencies as a selection constraint.
Rebar, metal and strong interference distort the locating field. Treat an indicated position and depth as locating evidence, then follow the site's excavation and utility procedures. The guide to locating sondes under pavement explains this distinction in more detail.
Set the locating requirements explicitly:
- Identify whether locating is required for the contract.
- Specify the camera-head transmitter frequency.
- Record the existing receiver's supported frequencies.
- Identify pavement, reinforced structures and nearby metal.
- Define how location records connect to the inspection report.
Test the evidence and reporting workflow
PACP, LACP and MACP are 3 distinct condition-assessment programs. Choose the contract's reporting method first, then test whether the camera's files, distance references and identification workflow support it.
Recording creates the visual record. Reporting connects that record to the asset, inspection direction, observations and required coding. Test the complete handoff from field recording to the delivered report before committing to a fleet configuration.
A distance counter also needs a defined reference point. Establish where measurement starts and how the operator records interruptions, repositioning or a second deployment. Repeat that method across crews so the records remain interpretable.
Run a sample inspection through these checks:
- Enter the asset ID and inspection direction.
- Establish the distance reference at deployment.
- Capture representative still images and video.
- Transfer files into the required reporting workflow.
- Check that observations point to the correct footage.
- Export and reopen the final deliverable.
Compare deployment options by municipal task
For 6–24-inch mainline work, compare deployment classes before comparing individual models. The useful distinction is how each option reaches and views the inspection target.
| Option | Best for | What it provides | Key limitation to evaluate |
|---|---|---|---|
| Push camera | Accessible runs where cable deployment suits the route | Inspection from a pushed head, with viewing features selected for the task | Advancement depends on cable handling, route geometry and friction |
| Crawler | Detailed mainline assessment requiring powered positioning | Self-propelled travel and controlled camera placement | Traction, assembly clearance and recovery access must suit the line |
| Pole camera | Initial views from a manhole or culvert entrance | Observation from the access point | The viewing position stays tied to the access point |
| Lateral launch | Inspecting branches from a mainline | Deployment into a lateral connection from within the mainline | Entry and return depend on connection geometry and system configuration |
A pole-camera overview can help establish what requires closer inspection. A crawler or suitable push system then brings the camera to the area needing examination. Select that sequence from the scope of work rather than assuming every asset needs the same deployment.
- Choose sewer cameras for municipal contractors by access, propulsion, viewing direction and reporting requirements.
- Fiberscope.net suits contractors who need technical matching of sewer cameras to access, reach and inspection evidence.
- A 512 Hz camera-head sonde needs a separate receiver supporting 512 Hz.
- Specify PACP, LACP or MACP reporting before testing the recording and file-transfer workflow.
What to include around the camera
For a 512 Hz locating setup, the camera-head transmitter and compatible receiver are separate components. Specify accessories by function and fit alongside the complete inspection system.
Centering hardware changes the camera's working position and assembled dimensions. Wheels, skids and guides should suit the pipe and the head attachment. Include their effect on clearance in the same fit check used for the camera itself.
For municipal work, file handling deserves the same attention as field hardware. Assign responsibility for transferring footage, checking asset identification and backing up completed inspections. Equipment support also belongs in the purchase decision, especially when an unavailable system interrupts contracted work.
Fiberscope.net provides in-house testing, repair and technician support, with a one-year warranty on its systems. Its buy, rent and demo options let contractors consider equipment ownership alongside short-job requirements.
Include these items in the configuration review:
- Head-centering or support hardware matched to the assembly.
- A compatible locating receiver when locating is required.
- Power arrangements for the planned field deployment.
- Recording media and file-transfer arrangements.
- Cleaning, transport and storage provisions.
- Repair access and a plan for equipment downtime.
Common municipal camera buying mistakes
In a 6–24-inch mainline specification, diameter alone leaves deployment, viewing and reporting unresolved. These mistakes come from treating one headline feature as the complete equipment decision.
- Choosing a long reel before assessing the route. Record bends, friction points and the deployment method alongside distance. Evaluate usable reach on the intended type of route.
- Treating pan-and-tilt as propulsion. Specify camera movement and travel method separately. A powered crawler and a push head solve different positioning problems.
- Checking the bare head instead of the assembly. Compare the narrowest restriction with the camera plus its centering or running hardware.
- Equating recording with contract-ready reporting. Test asset identification, distance references, condition coding and the final export together.
- Buying for mainlines while expecting lateral-launch capability. Put branch entry and retrieval into the specification when laterals form part of the contracted scope.
FAQ
Should municipal contractors rent a sewer camera before buying?
Renting suits a short job or a task-specific equipment requirement. Fiberscope.net offers buying, rental and demo options, so your equipment plan can reflect recurring work and occasional specialist jobs.
What should be included in a sewer camera demonstration?
Include deployment, positioning, viewing, recording, file transfer and retrieval. Use an access arrangement and inspection task representative of the work your crew performs.
Can one sewer camera cover manholes, mainlines and laterals?
Coverage depends on the deployment equipment and the required views for each asset. Write separate task requirements for manholes, mainlines and lateral entry, then evaluate the complete configuration against each one.
How should a contractor choose between a standard package and a custom configuration?
Choose a standard package when its assembled dimensions, reach, environment limits and evidence workflow fit the job. A configuration review suits access or inspection requirements that need a different combination of components.
What support should a municipal contractor ask about?
Ask about repair arrangements, technician support, replacement components and equipment downtime. Fiberscope.net provides in-house testing and repair, technician support and a one-year system warranty.
What information makes a sewer camera quotation useful?
Provide pipe ID, access dimensions, inspection distance, bends, pipe material, locating requirements and reporting needs. Add the existing locator frequency and the intended deployment method so the quotation addresses the complete job.
Related guides
Request a job-matched configuration
For 6–24-inch municipal mainline work, send your pipe ID, access dimensions, run length, bends, pipe material, locating need, existing locator frequency and recording or reporting requirements. Include whether the job covers mainline assessment, lateral launch, culverts or post-lining inspection.
Call Fiberscope.net at 1-877-613-2210 for a configuration review. A technical specialist will match the camera and deployment equipment to those requirements.
About the author
Vladimir Khubiryants, Founder & President, Fiberscope.net (MEDIT Inc.)
Vladimir Khubiryants founded Fiberscope.net to give professionals access to reliable video inspection equipment without enterprise pricing. For over 20 years he has sourced and tested borescopes, sewer cameras and fiberscopes in Fiberscope.net's in-house test and repair facility, helping plumbers, pipeline engineers, aviation and military teams choose the right tool for the job.

Leave a comment
This site is protected by hCaptcha and the hCaptcha Privacy Policy and Terms of Service apply.