

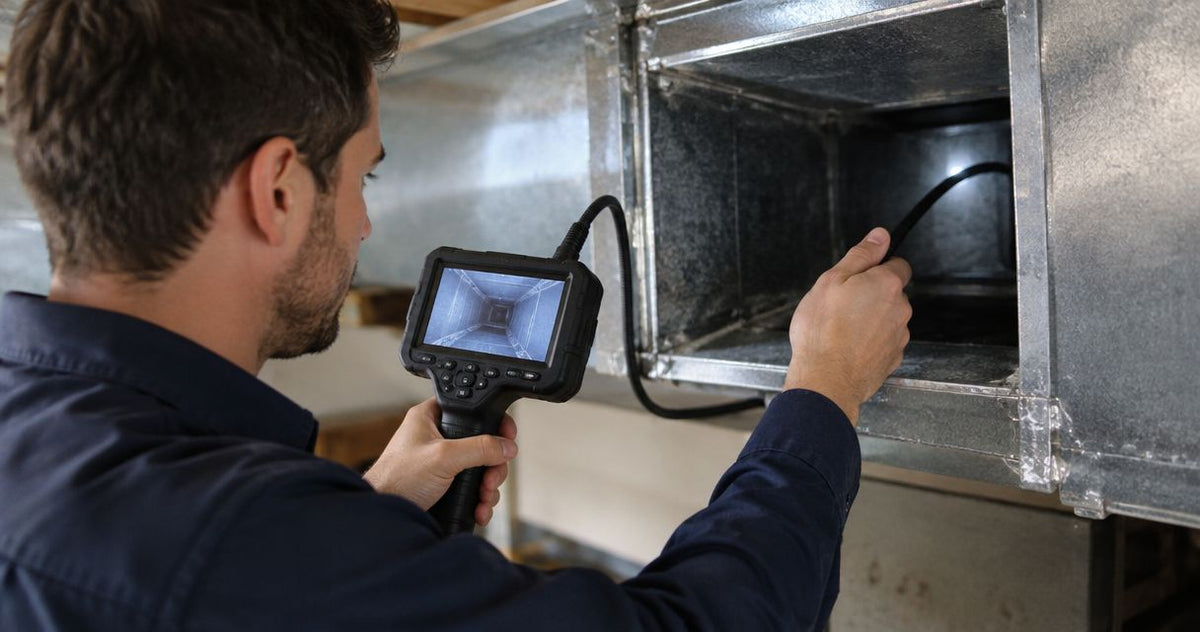
A borescope lets you inspect accessible HVAC duct surfaces through a register, service opening or other suitable access point. The challenge is seeing enough of the duct to answer the job’s question: a close-up of debris near a grille says little about the branch beyond an elbow. Match the access, route and required evidence before choosing the camera.
Yes, you can use a borescope to inspect HVAC ducts. Use one for local checks around an opening, coil or plenum; use a duct inspection camera when deployment, lighting and viewing direction must cover more of the system. This guide explains how to plan the inspection, capture useful footage and report the coverage. Fiberscope.net sells inspection cameras and services them in-house.
Can you use a borescope to inspect HVAC ducts?
A borescope works for local visual inspection when its probe clears the access and its working length reaches the target. Working length means the usable insertion length; probe OD means the probe’s outside diameter. Both matter, but the route determines whether you can put the lens where you need it.
Start by separating the inspection into a specific question and an accessible surface. “Check the return plenum for debris” gives you a target. “Inspect the HVAC system” needs a coverage plan covering branches, trunks and components.
| Inspection approach | Suits this task | Main strength | Practical limit |
|---|---|---|---|
| Borescope through an existing opening | Local checks of a nearby duct wall, coil face or plenum | Small access requirement and close viewing | Probe support, lighting and steering determine coverage |
| Dedicated duct inspection camera | Documenting surfaces farther from the opening | Deployment method designed around duct access | Bends, obstructions and branches still restrict the route |
| Direct viewing through an access panel | Accessible components and nearby surfaces | Clear orientation and room to inspect | Coverage ends where the direct sightline ends |
A turning tip changes the viewing direction. It does not pull the probe through an elbow or support it across a large trunk. That distinction prevents buying articulation when the real requirement is controlled deployment.
For equipment-selection criteria beyond this procedure, see how to choose a duct camera for duct cleaning companies.
Plan the inspection around access, route and evidence
Record the access opening, target distance and duct dimensions before selecting the camera. Treat a 6-inch branch and a large rectangular trunk as different viewing problems, even when both connect to the same air handler.
Use the following decision sheet during the walkthrough. It connects the field measurement to the camera requirement without assuming that duct diameter alone determines fit.
| Field check | What to record | What it determines |
|---|---|---|
| Access | Clear opening and obstructions immediately behind it | Maximum head size and insertion approach |
| Route | Straight section, elbow, damper, junction or vertical drop | Probe support and deployment method |
| Reach | Distance along the intended route | Required working length |
| Target | Near wall, opposite wall, coil face or junction | Viewing direction and usable illumination |
| Evidence | Location, orientation and required detail | Recording and identification method |
| Surface | Bare metal, liner or flexible duct | Contact and handling precautions |
For example, consider a planned check of a 12 ft (3.7 m) section of 6-inch branch duct. The camera must reach the target along the actual route, including the distance between the insertion point and the start of that section. An elbow or damper changes the deployment problem even when the distance remains the same.
Keep this example separate from equipment capability. Your measured route is the purchasing requirement; the camera’s working length, head dimensions and handling characteristics determine whether it meets it.
How to inspect HVAC ducts step by step
Use a repeatable sequence: identify the section, make access safe, establish orientation, inspect, record and restore. Keep the camera under visual control as you advance.
Identify the section and inspection question
Write down the equipment served, supply or return side, access point and intended endpoint. Mark the route on a sketch or available duct drawing so the footage has a physical location.
Choose the question before inserting the camera. Typical HVAC inspection questions include:
- Where has debris accumulated before cleaning?
- What does the accessible coil face or plenum surface look like?
- Is visible duct liner damaged or displaced?
- What remains after cleaning at the same observation point?
- Which surface needs closer examination or another access point?
Separate general condition footage from close-up evidence. The overview establishes location; the close-up records the feature that matters.
Make access safe
Arrange shutdown and hazardous-energy control appropriate to the equipment and task before opening the system or placing a probe near moving components. OSHA’s lockout/tagout requirements address servicing exposure to unexpected energization and stored energy.
Use existing service openings where practical. Plan any new access with the responsible HVAC contractor, accounting for duct construction, insulation, internal components and the required closure.
Protect yourself from sharp sheet-metal edges and support removed panels or grilles. Keep the probe clear of fan wheels, belts, dampers and other mechanisms that can catch it.
Prepare the camera outside the duct
Clean the lens, check the image and test recording before insertion. Capture a short clip and play it back so you know the evidence is being saved.
Set the identification method at the same time. A job label, section identifier and access-point reference make the files easier to connect to the report.
Check that the selected head and deployment method suit the opening. Guide the probe around exposed edges and keep the cable arranged so you can feed and retrieve it without dragging it across sharp metal.
Establish orientation at the opening
Record the entry view before advancing. Identify a fixed feature, such as a seam, junction or access frame, that helps you explain direction later.
For rectangular duct, identify the floor, ceiling and sidewalls. For round duct, maintain a consistent orientation reference as the probe moves.
A recognizable entry view is especially useful when the lens rotates during insertion. It gives the reviewer a starting point rather than an unexplained close-up inside a metal passage.
Advance while maintaining a usable image
Feed the probe slowly enough to keep the image interpretable. Pause at joints, elbows, dampers and changes in surface condition.
Adjust illumination when a nearby wall becomes washed out. When the opposite wall stays dark, change the lens position or access point rather than treating the near-wall image as coverage of the whole section.
Support the probe with the deployment equipment designed for it. A soft insertion tube that bends easily at an opening can become difficult to position farther into an open trunk.
Capture context before detail
Record the surrounding duct before moving closer to a deposit, damaged liner or other feature. Keep a fixed landmark in view when practical.
Describe what the image shows in observable terms: loose debris on the duct floor, a visible gap at a joint, standing water, or a discolored liner surface. Use the report to distinguish the observation from the investigation needed to explain it.
The EPA’s air-duct guidance explains that visual appearance alone cannot positively identify biological growth. Refer suspected contamination for appropriate assessment instead of assigning a diagnosis from camera footage.
Retrieve, restore and review
Watch the image during retrieval and stop if the head catches. Change the approach or use another access point rather than pulling harder against a fitting or liner.
Restore panels, grilles and access closures according to the applicable service procedure. Clean the inspection equipment as appropriate for the material encountered and its manufacturer’s instructions.
Review the saved files before leaving the site. Check that each important observation has a location, a context view and a usable detail view.
Why inspection coverage varies
Working length sets reach, while access and route determine usable coverage. A longer probe adds insertion distance; effective inspection still depends on positioning the lens and lighting the target.
Four factors commonly change the inspection plan:
- Access position: An opening beside an elbow gives a different sightline from an opening facing a straight run.
- Route geometry: Dampers, turning vanes and junctions restrict movement and obscure surfaces.
- Probe support: Flexible probes need a suitable way to reach and hold a viewing position.
- Lighting and distance: Nearby metal reflects light strongly while distant surfaces need useful illumination at the target.
- Surface condition: Dust on the lens, wet surfaces and loose liner interfere with interpretation or movement.
- Evidence requirements: A local troubleshooting check needs different coverage from documented before-and-after cleaning observations.
If you already own a borescope, test it against the actual inspection requirement before buying another system. For an occasional specialized assignment, renting a borescope for a single industrial job addresses the purchase decision separately from field technique.
What should before-and-after duct footage show?
Before-and-after footage should show the same identified surfaces from comparable positions. For the 12 ft (3.7 m) example, record the actual endpoint reached and identify any portion left outside the view.
Keep the access point, viewing direction and recognizable landmarks consistent. Save an overview and then the detail that prompted cleaning or further investigation.
Use a location-based file name rather than relying on recording order. A return-plenum identifier is more useful to the next technician than an unexplained sequential clip number.
For work performed under NADCA ACR, follow the project’s applicable assessment, cleaning and cleanliness-verification requirements. Camera footage supports the record; the required verification method depends on the work and specification.
The guide to documenting duct cleaning for NADCA ACR with a camera covers that reporting task in more detail.
What should you do when the camera stops at an elbow?
Stop advancing and identify what the screen shows before changing the approach. A bend, closed damper, unsupported probe or caught head requires a different response from debris blocking the lens.
Retrieve enough probe to regain orientation. Check the route and choose another existing access point when it gives a cleaner approach.
Keep the inspection scope accurate. Report the section reached and the obstruction encountered, then identify the next access needed to complete the task.
FAQ
Can I inspect ducts while the HVAC fan is running?
Inspect with equipment placed in the safe condition required for the task. Arrange appropriate shutdown and hazardous-energy control before inserting a probe near moving equipment.
Should I cut a new opening for the camera?
Use a suitable existing access point first. Have the responsible HVAC contractor plan any new opening and its closure around the duct construction and internal components.
Can duct camera footage prove an air leak?
Camera footage can document a visible opening or damaged joint. Use the appropriate leakage assessment to establish air leakage and its significance.
Should I clean the duct before recording its condition?
Record the initial condition before cleaning when the job requires before-and-after evidence. Keep the access point and viewing direction consistent for the follow-up recording.
What should I do if the lens gets dusty?
Retrieve the probe and clean the lens using the camera manufacturer’s procedure. Resume from an identifiable landmark so the interruption remains clear in the inspection record.
Can I use a camera inspection to assess airflow?
A camera records visible internal conditions. Use appropriate airflow measurements to assess system performance and connect those measurements to the observed condition.
Match the inspection camera to the duct route
Fiberscope.net inspection-camera support suits HVAC professionals choosing equipment by access, route, reach and recording needs. Start with those requirements rather than a feature list.
Send Fiberscope.net your access opening, duct dimensions, straight or turning route, insertion length, viewing direction, environment and recording requirements. Call 1-877-613-2210 for a configuration review.
About the author
Vladimir Khubiryants, Founder & President, Fiberscope.net (MEDIT Inc.)
Vladimir Khubiryants founded Fiberscope.net to give professionals access to reliable video inspection equipment without enterprise pricing. For over 20 years he has sourced and tested borescopes, sewer cameras and fiberscopes in Fiberscope.net's in-house test and repair facility, helping plumbers, pipeline engineers, aviation and military teams choose the right tool for the job.

Leave a comment
This site is protected by hCaptcha and the hCaptcha Privacy Policy and Terms of Service apply.