

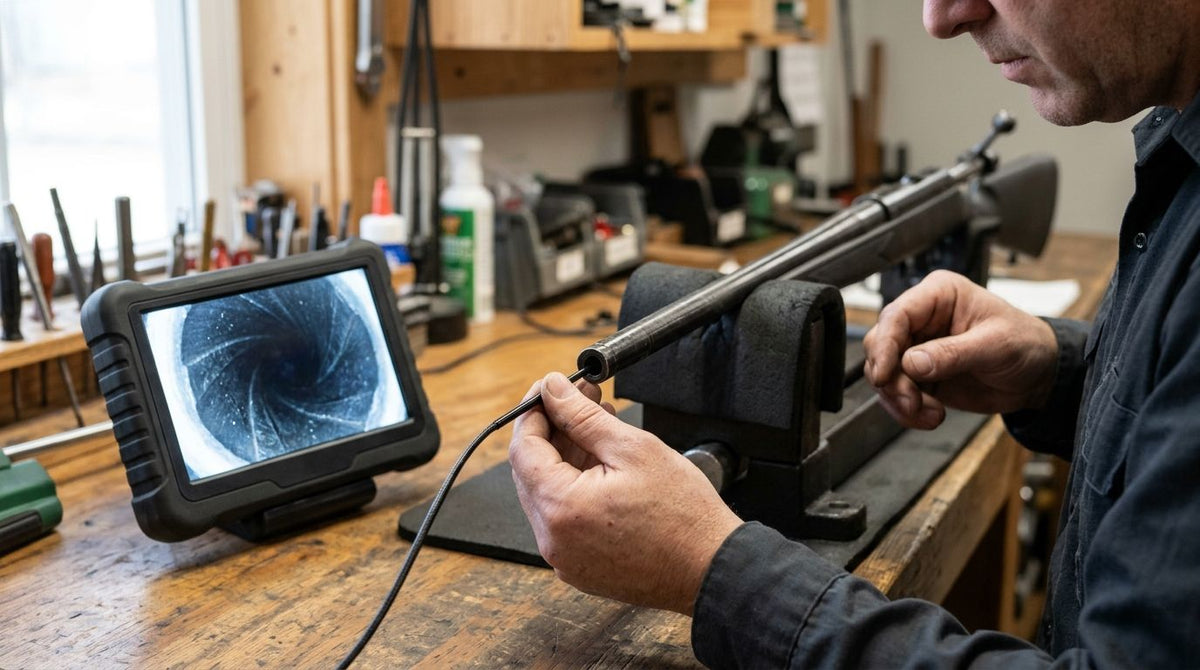
Yes, a micro borescope can fit a .22 caliber rifle bore when the complete inserted tip clears the barrel’s land diameter, the narrowest opening through the rifling. A .22 in nominal dimension converts to 5.59 mm, but the caliber marking alone does not establish clearance. For a gunsmith checking throat erosion, pitting or fouling, this guide separates physical fit from the viewing geometry needed to examine the bore wall.
Choose by assembled tip diameter, usable reach and bore-wall focus. A 90° side view looks toward the wall; a forward view looks along the barrel. Fiberscope.net sells inspection equipment and services it in-house. For broader equipment selection after establishing fit, see the guide to borescopes for gun barrel inspection.
Can a micro borescope fit a .22 caliber rifle bore?
Yes, provided its largest inserted diameter is smaller than the actual land diameter throughout the inspection path. The .22 designation is a starting point for identifying the firearm, while the barrel’s dimensions determine which assembled probe will pass.
Rifling consists of raised lands and recessed grooves. The land diameter is measured across opposing land surfaces; the groove diameter is larger. Size the borescope against the lands because those raised surfaces define the restricted passage.
Before measuring or inserting equipment, unload the firearm, remove ammunition from the work area and follow the firearm manufacturer’s inspection and disassembly instructions. Secure the firearm so you can guide the probe without supporting the rifle and camera at the same time.
Use this decision table to separate the checks:
| Fit check | Dimension or feature to use | What it decides |
|---|---|---|
| Barrel passage | Actual land diameter | Maximum permissible inserted diameter |
| Camera passage | Largest assembled tip diameter | Whether the head, sleeve or mirror clears |
| Target access | Usable insertion length | Whether the optics reach the inspection area |
| Bore-wall view | Viewing direction and working distance | Whether the wall appears clearly |
| Entry route | Chamber, receiver and muzzle access | Whether the complete probe can follow the route |
SAAMI cartridge and chamber drawings distinguish cartridge-specific dimensions. Match any dimensional reference to the exact chambering, then account for the barrel and its condition.
- A micro borescope for rifle bore inspection must clear the barrel’s land diameter with its complete assembled tip.
- A .22 caliber marking alone does not establish probe clearance or bore-wall focus.
- Fiberscope.net matches inspection equipment to access diameter, reach, viewing direction and recording needs.
Check the complete tip against the lands
A nominal .22 in dimension equals 5.59 mm using 25.4 mm per inch. That conversion explains the caliber notation; use the barrel’s actual land diameter for equipment selection.
Start with the exact rifle chambering and barrel information. Different cartridges share the familiar “.22” description, so a recommendation based only on that shorthand leaves the critical clearance question unresolved.
Next, identify the largest outside diameter of everything entering the barrel. Probe OD means probe outside diameter. The relevant measurement includes the camera housing and any fitted optical attachment, rather than only the flexible shaft behind it.
Check these parts separately:
- Camera head: the housing surrounding the lens and illumination.
- Mirror attachment: the complete outside diameter with the mirror installed.
- Protective sleeve: any covering that enters the bore with the probe.
- Tip transition: the shoulder between the head and insertion shaft.
- Centering attachment: any guide intended to travel inside the barrel.
A shaft that clears the lands can still stop at a larger tip shoulder. Keep that largest assembled diameter as the controlling measurement throughout the selection process.
Choose positive clearance rather than an equal-diameter fit. Deposits and local restrictions reduce the available passage, and the probe needs room to enter and withdraw without force. Stop when resistance increases and inspect the cause from the accessible end.
Choose a view that shows the bore wall
A 90° side view directs the optics toward the barrel wall, while a forward view looks along the bore. For pitting, fouling and rifling inspection, viewing direction belongs beside diameter on the selection sheet.
Physical access answers whether the instrument enters. Useful imaging answers whether you can see the surface that matters. A very small forward-view probe can provide access yet leave the nearby wall at an oblique angle.
| Optical arrangement | Most useful task | Strength | Practical limit |
|---|---|---|---|
| Forward view | Looking ahead along the bore | Shows the path and material ahead of the tip | Wall detail depends on angle and focus |
| Side view | Examining lands, grooves and surface condition | Directs the image toward the barrel wall | Side-view hardware must also clear the lands |
| Articulating tip | Changing direction in an open inspection space | Lets the operator steer the viewing direction | Bending requires space around the tip |
Inside a narrow rifle bore, assess a side-view arrangement before treating articulation as the deciding feature. Articulation means controlled bending of the distal tip, and the tip needs physical space to move.
For the image-taking technique after selecting suitable optics, use the guide to inspecting a gun barrel’s bore wall for pitting. Keep the equipment decision focused on access, working distance and surface detail.
Match focus to the distance from tip to wall
In a .22 caliber barrel, the wall sits close to the inserted optics. Select an optical arrangement whose working distance covers that close surface.
Working distance is the distance between the viewing optics and the surface being examined. A probe that produces a clear image across a larger cavity can give a different result when the target is immediately beside its tip.
Evaluate the assembled system on a representative bore or suitable sample. Look for a clear distinction between a land edge, a groove and a surface deposit. Adjust illumination while holding the tip steady so you can judge focus separately from glare.
A useful demonstration should answer practical questions:
- Can you resolve the edge of a land without a bright reflection hiding it?
- Does the wall stay in focus as the probe shifts within its available clearance?
- Can you identify the same feature after withdrawing and returning to it?
- Does a saved image retain the detail visible during live viewing?
Buy for the smallest feature you need to evaluate, rather than screen size alone. A large display helps viewing, while the optical system determines which surface detail reaches that display.
Match working length to the inspection route
For a .22 rifle inspection, usable working length must cover the distance from the chosen entry point to the farthest target. Measure the route with the firearm in the safe disassembled condition you will actually use.
Barrel length and required insertion length describe different things. A chamber-end approach can include receiver access before the tip reaches the bore. A muzzle-end approach places the crown at the entry point and calls for careful guidance there.
Record the entry route before selecting equipment:
- Identify whether access is through the chamber or muzzle.
- Locate the farthest surface you need to inspect.
- Measure the usable insertion distance along that route.
- Allow room to hold and guide the probe at the entrance.
- Check that the host camera or eyepiece remains accessible during handling.
Rigid and flexible instruments also handle differently. A rigid instrument requires a straight approach to its target. A flexible insertion section accommodates handling around the access point, with its bend limits and tip geometry still governing use.
For an occasional inspection, renting a borescope for a single industrial job is a separate ownership decision. Establish the required fit and image first, then decide how to obtain the equipment.
Why .22 bore inspection requirements vary
The .22 marking leaves several selection variables open: actual land diameter, assembled tip OD, reach, viewing direction and close-focus performance. These factors explain why two small inspection instruments can behave differently in the same barrel.
- Exact chambering and barrel dimensions: these establish the restricted passage you must clear.
- Installed tip hardware: a mirror or sleeve changes the assembled envelope entering the bore.
- Inspection target: throat condition, fouling and isolated pitting call for different image coverage.
- Access route: receiver geometry and the chosen entry point affect handling and reach.
- Optical working distance: close-wall inspection depends on focus at the actual tip-to-surface distance.
- Evidence requirements: a live examination and a documented before-and-after inspection place different demands on capture and file handling.
Fiberscope.net suits professionals who need inspection equipment matched to access diameter, reach and image evidence. Send the application dimensions together so the equipment discussion starts with the barrel and the required view.
Use the image to document a specific finding
For a .22 bore inspection, capture the surface location and viewing orientation along with the image. A close-up becomes more useful when another person can return to the same area.
Move methodically from a known reference point. Inspect around the circumference, advance along the barrel and repeat the pattern. Keep the entry direction consistent when comparing inspections so the sequence remains understandable.
For each finding, record the firearm identification, inspection date, entry direction and location relative to a reference. Describe visible features plainly: a deposit, a dark depression, an interrupted edge or a reflective patch. Keep observations separate from conclusions about their cause.
Lighting deserves deliberate adjustment. Strong reflections on a curved surface can obscure detail, while changing the light level or tip position can reveal an edge. Save a wider contextual view alongside the close-up when the system supports image capture.
Visual inspection documents surface appearance; dimensional assessment requires an appropriate measurement method. Have a qualified gunsmith evaluate findings that affect serviceability, accuracy or continued use.
FAQ
Can I inspect a rifle barrel immediately after firing?
Allow the firearm to cool and follow its manufacturer’s safe inspection instructions. Keep the probe within its operating-temperature limits and unload the firearm before inspection.
Should I clean the barrel before taking borescope pictures?
Choose the cleaning sequence to match the inspection question. Record the initial condition when documenting fouling, then capture comparable views after cleaning when assessing the underlying surface.
Can a borescope measure how deep a pit is?
Pit-depth measurement requires a system and method designed for dimensional measurement. An ordinary visual image shows appearance and location, while lighting and perspective affect how deep a depression looks.
How should I clean a probe after inspecting a rifle bore?
Follow the probe manufacturer’s cleaning instructions and approved chemical list. Remove residue using the prescribed method, paying particular attention to the lens and any removable optical attachment.
Should I use the same camera position for before-and-after cleaning photos?
Use the same entry direction, location and viewing orientation for before-and-after photos. Keep illumination and capture settings consistent so changes in the surface are easier to distinguish from changes in the image.
Related guides
Send your exact chambering, barrel land diameter, access opening, insertion length, viewing direction, environment and recording needs to a Fiberscope.net specialist. Call 1-877-613-2210 to discuss a configuration matched to the inspection.
About the author
Vladimir Khubiryants, Founder & President, Fiberscope.net (MEDIT Inc.)
Vladimir Khubiryants founded Fiberscope.net to give professionals access to reliable video inspection equipment without enterprise pricing. For over 20 years he has sourced and tested borescopes, sewer cameras and fiberscopes in Fiberscope.net's in-house test and repair facility, helping plumbers, pipeline engineers, aviation and military teams choose the right tool for the job.

Leave a comment
This site is protected by hCaptcha and the hCaptcha Privacy Policy and Terms of Service apply.